Saturday, May 30, 2009

Watermarks

Watermarks in Aperture can be boiled down to the following steps:
  1. Go to Aperture > Presets > Image Export...
  2. In the Presets window, click "Show Watermark."
  3. Select an image to use
  4. Adjust position/opacity
  5. Select to scale watermark or not
  6. Repeat steps for each export type you want a watermark
Sounds pretty straight forward until you get into the subtleties of how this feature behaves. First, to create your watermark you have to have made the raster image in some external editor (Photoshop, Pixelmator, etc.). Save that file out as PSD, JPG, or (my personal preference) PNG. Now here's the thing about that watermark file you just made. The resolution of your watermark has a big impact on how it's finally rendered. For the sake of this argument, I made my watermark and just trimmed out all the excess. That left me with a 508x283 file. I'm going to export out two images. One is a healthy 3892x2586 image. The other is a relatively petite 1774x1183 image. Take a look at the results:
If you click through the two photos you'll see how the watermarks are rendered. Aperture will only scale DOWN your watermark not up (if you selected "Scale Watermark" in the preset). Depending on the resolution of your photo compared to your watermark, your watermark can be really big or really small. In order to get around that, I went back to edit my watermark file. I changed the canvas size of the watermark from 508x283 to 4000x283. I go back into the Aperture presets and reload my file (Aperture seems to make a copy of this image, so you can't just save over your previous file). I also make sure that I've checked "Scale watermark." I'll export the same two files again. Now you'll see that the watermark in the pictures are relatively the same size. Before Aperture wasn't scaling the watermark. Because I made my watermark file so wide, it forces Aperture to scale.
Using the super wide watermarks also ensures that your portrait photos are watermarked with a similarly sized watermark.

Once you have your watermarks all sorted out, there's two things that I really like about using watermarks as export presets. One, this works with the Flickr export plugin. Since the Flickr export plugin just uses the export presets, those watermarks will get uploaded with your photo. Two, you can make different watermarks for different export presets. Sounds dumb, but this allows you to make a watermark for your 800x800 export that looks different than your original size exports. You can also keep one export with watermark and another one without.

I'll wrap up this post with some wishlist things for watermarks:
  • Text based watermarks from EXIF - Sometimes all I want is a simple watermark with my name or some other EXIF data. There's no way to do this without using an export plugin.
  • Scale watermarks relative to image - Instead of making me hack my image, I want to have a simple stamp and have that be consistently sized relative to the photo.
  • Borders - Not quite watermarks, but I would like to have some rudimentary borders support for Aperture. Just some desaturation or blurring would be nice.

Tuesday, May 26, 2009

Lift & Stamp

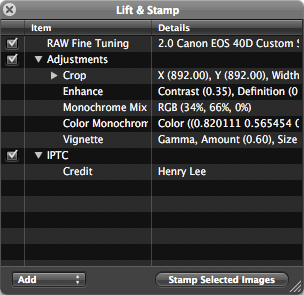
Lift & Stamp is the equivalent of copy & paste for all your image adjustments and metadata. To "copy" or Lift your adjustments, you can either select the button or use the keyboard short cut ⌘C. I'm kind of a keyboard shortcut nerd if you haven't noticed already. When you Lift the adjustments, the Lift & Stamp window pops up with all the adjustments. You can use the checkbox to selectively apply items or you can select the item and hit delete remove the item from the stamp. The problem with using the checkboxes is that it's not particularly granular. You're bound to these high level buckets of stuff. So if you didn't want to apply Crop but wanted to apply all the other Adjustments, you can't use the checkbox. Instead, you have to select the Crop item and hit delete. If you want to apply all the adjustments and the Crop, then you have to go back to the source image and re-Lift the adjustments. Once you've got the adjustments you want, now you Stamp the adjustments. The great thing about stamping is that it can be applied to multiple items at once. Select whatever pictures you want to stamp, and then hit ⌘V (note the similarity in keyboard shortcut to copy & paste). Voilá! All of your chosen adjustments are now applied to your pictures. This should save some time when you have a lot of similar pictures. Sometimes when I forget to add the Credit keyword on import, I'll make the change to just one image. Lift the IPTC keyword, select all the pictures in the album, and stamp! Easy.

I don't use the Lift/Stamp tool (O / ⇧O). It lets you Lift from or Stamp to an image that you currently don't have selected. It doesn't really jive with my personal work flow. I like going to the source image and using the keyboard shortcut to Lift. Then browsing to my target image(s) and Stamping.

Wishlist item for future Aperture: checkboxes next to each adjustment in the Lift & Stamp window. I want to selectively apply my adjustments to some images but not others.

Update: Looks like the Aperture team broke one of the most useful features with Lift/Stamp. You can no longer use the keyboard shortcut to stamp metadata and adjustments across multiple pictures. You have to use the button from the Lift & Stamp window. If anybody on the Aperture team out there is reading this, fix it or at least explain why.

I Love Vignettes

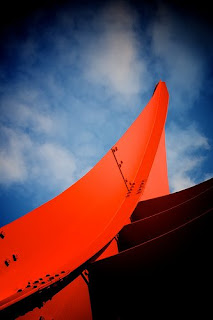
There. I've said. I don't care who knows. That (sometimes) subtle edge effect can take a boring photo to a slightly less boring photo. But at least the vignette helps to focus to viewer's eyes in the photo. ^+V will add the default vignette to your photo. You could use your mouse and do some clicking around, but that's rather inefficient for something that you'll probably end up using all the time.

When you use vignettes and cropping in Aperture, your vignette will be reapplied. The vignette's center will always be at the center of the image. It's best to vignette AFTER cropping.

As far as settings go, it's totally personal preference. I find that I use Gamma vignettes more often than Exposure. The Amount and Size are really dependent upon the individual picture. But for both values, I tend to go a little heavier than the default. The picture that I used for this post was from me testing to see what the max Amount of vignette I can apply to a photo. It looked cool, so I'm using it here.

Here's an extra tip about sliders in Aperture. Whatever is the max value the slider can go, you can usually enter in a higher value. For example, in the Vignette adjustment palette, the Amount slider can only go to 1.0. In the input box, you can enter in any number up to 5.0.

Adding to my wishlist for future Aperture:
  • Vignettes that lighten instead of darken
  • Square instead of round (or any permutations in between)
  • Redefine center of vignette

Sunday, May 24, 2009

Monochrome is boring

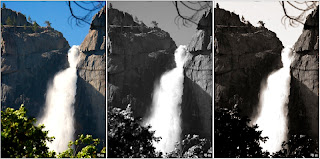
Simply taking a picture and making it monochrome (⌘+M) is really boring (see the middle picture). Seriously. There's a lot you can still do to a picture once you've desaturated it. First thing I do is I start going through all the color filters in the Monochrome Mixer. If I'm trying to highlight people, I prefer one of the warmer filters. Landscape for the cooler stuff. Once I've picked one that I like, then I start bumping up the contrast in the Enhance palette. For the picture on the right, I've got it set to a blue filter and the contrast at 0.25. Then to give my "black & whites" some variety, I'll sometimes then throw on some Color Monochrome action on top. For this picture, I just used the default color and lowered the Intensity to 0.4. I also added a Vignette, but I applied that to all three samples so that doesn't really count.

Here's the result. (Yes, I could have cleaned up the picture more, but you get the idea.):

Wednesday, May 20, 2009

Organizing My Photos (Part III)

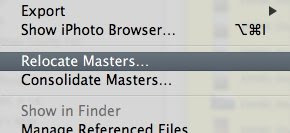
I'm a MacBook Pro kind of guy. That means I have limited hard drive space and I take my Aperture library with me wherever I go. The trick is, I don't take it all with me when I go. That's where Relocate Masters and Consolidate Masters come in. Whenever I'm done working on a project, I relocate my masters to an external drive. It moves my masters out of my library but leaves the previews and metadata on my MacBook Pro's hard disk drive. Now the downside of relocating is that whenever I want to go back and edit that project, I need to be connected to the external drive. That's where Consolidate Masters comes in. With that external drive connected, I can bring those masters back into my library and weigh down the HDD. Another problem with relocating is that since the masters are no longer in the library, they don't get backed up into the Vault. So I make it a point of regularly backing up that external masters drive. Besides backing it up to two separated RAID drives in two separate locations (I'm OCD. I know.) I also burn every image to an optical backup. When I relocated my masters, under Subfolder Format I choose: Image Year/Month/Day. Then when I back up, I just select as many months as can fit on a disc. This keeps my optical discs in relatively tidy order. Since I named all my files, then it's also easy to find for what I'm looking.

Organizing My Photos (Part II)

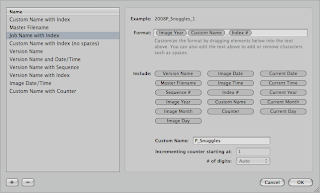
When I import my files (or at least soon after using Batch Change), I rename my files so that I can find my files when I'm not using Aperture. It also makes the files a lot more meaningful than IMG_3728. Here's the format that I use: YYYYT_NAME_X.
  • YYYY = Year
  • T = Type of shoot (more on that below)
  • NAME = Something meaningful to me. If I shoot a wedding, it's usually the name of bride
  • X = Index #. It starts at one.
For the type of shoot, I use a bunch of single alpha codes to designate the shoot.
  • P = Portrait
  • W = Wedding
  • C = Commercial Job. Usually for stock photos or some other request that doesn't involve people.
  • D = Photowalk Days
  • E = Event. At parties or whenever I'm just out and about, it's usually an event of some sort.
  • Y = Yelp Event (yes, I shoot enough of these for it to warrant its own code)
  • V = Vacation photos. Look. Everybody has them. Might as well call them out.
  • S = Snapshots. Usually stuff on my P&S. Just random stuff. Generally stuff that's not particularly important to me.
  • T = Experimental/Test. Whenever I'm trying out some new technique or toy, I tag these photos with T. They're usually of pretty low value but entertaining nonetheless.
So in my screenshot, my example is 2008P_Snuggles_1. In 2008, I did a portrait session with Snuggles (the Yorkie) and that's the first photo in the series.

Unless you renamed your files on import, when you run the Batch Change ⌘B Aperture doesn't rename the files it only renames the Version. To get Aperture to rename the files, Relocate Masters and in the Name Format drop down, select Version Name. Then Consolidate Masters to get the files back into your Library.

Monday, May 18, 2009

Organizing My Photos (Part I)

How you organize photos is all a matter of personal preference, but here's the way I do it and it works for me (most of the time). I have folders for every year. For every shoot, it's its own project. I label each of those projects, "MM-DD Name." For example, 06-15 Farmer's Market or 10-12 Fleet Week. Since all those are in the annual folder, I can usually jump to a particular shoot pretty quickly. When I do a shoot or have an event that spans multiple days, I put each day or each major piece of the event (for example, each day of a vacation or each location) in its own project. Then all those projects sit inside of a folder with the first date of the shoot as its title. For example, 05-12 Hawaii. Then that folder sits inside the annual folder. If I was more prolific as a photographer, I would probably have both annual and month folders. But I'm not. So the annuals work fine for me. Another benefit to using projects and folders in this fashion is that clicking on the folders will give you a thumbnail view of all the pictures contained within the folder.

Why projects instead of folders and albums?
Well for one, you have to start with a project to get your files into Aperture. And that oh so convenient feature of clicking on a folder to see all the children photos doesn't work. So if you started out with one project then made folders of albums within that project, you won't be able to see the aggregated thumbnails. Sorry!

The thing about projects is that they are the basic units of import/export by Aperture. If you control click, you'll find a bunch of features tailored to projects. So if you kept everything in one giant project, some export/relocate/consolidate functionality will be really hampered. I'll get into how I manage my files later and I depend heavily on relocating and consolidating photos.

Sunday, May 17, 2009

Activity Window

Aperture does a lot of stuff in the background: export, generate thumbnails, generate preview, import, etc. When I find that Aperture is sluggish or when I want to just see how my progress is coming along, I bring up the Activity Window. It's located conveniently under the Window menu. But for some reason it's not mapped to a keyboard shortcut by default. Fortunately every single menu item can be mapped to a keyboard short.

So in the Commands menu (Aperture > Commands), you can customize all shortcuts. But you can't edit the default set so the first thing you have to do is duplicate the defaults to your own set. I cleverly named mine "MyDefault." The command is listed under "Show / Hide Activity." I mapped it to ⌘+0. That's the same as the Activity Window in Mail.

Tags vs. Keywords

Basically keywords will get exported out and tags don't. Tags can be used for search in the same way that keywords do... except that Apple doesn't give tags functionality nearly as much love as the keyword functionality. I find that I use tags more often than keywords as a supplement to my cataloging since I often don't want those values to get exported out. I'll throw stuff like event name or if I'm shooting people I'll put tags with their names in it. It's not a big deal to some to export out the names with their files; I like to maintain a little privacy.

To create tags:

  1. bring up the Metadata inspector (^D).
  2. Edit the view (^I).
  3. Click on the Other tab at the bottom.
  4. Then enter your new Custom Metadata
  5. Click on the checkbox next to your new field to add it to the view.

Now you should be able to add custom tags to your heart's content.

Hold down ⌘ when cropping

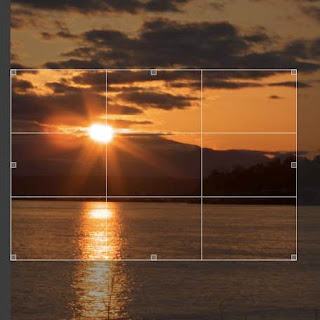
When cropping photos in Aperture 2, holding down the ⌘ (Command) key brings up these crop grid lines for aligning to the rule of thirds. It makes for some easy cropping, but I would like more. I'd like to have some options for what kind of lines do display: golden rule, nautilus shell (golden curve), diagonal lines, etc. Also there should be a preference to always display the lines. Then holding down the command key either hides or displays the grid lines depending on your preference.