- Select the Red Channel
- Apply these values:
- B: 0.00
- 1/4: 0.19
- G: 0.28
- 3/4: 0.47
- W: 0.92
- Select the Green Channel
- Apply these values:
- B: 0.00
- 1/4: 0.16
- G: 0.31
- 3/4: 0.66
- W: 1.00
- Select the Blue Channel
- Apply these values:
- B: 0.00
- 1/4: 0.30
- G: 0.59
- 3/4: 0.80
- W: 1.00
- Exposure: -0.54
- Highlights: 42.5
Wednesday, December 9, 2009
C01 Cross Processing
Friday, October 30, 2009
Cross Processing: Part 1 of... um, maybe a lot?
I'm a big fan of Aperture's plug-in architecture. The one I use most often is probably Color Efex Pro 3.0 by Nik Software. But the downside of using plug-ins, is that once the image goes through the plug-in, you lose the non-destructive nature of editing photos in Aperture. So over the next few weeks, I'm going to attempt to recreate as many of the cross processing methods in Color Efex by just using the Levels palette within Aperture. I'm going to just go down the list starting with B01.- Select the Red Channel
- Apply these values:
- B: 0.21
- 1/4: 0.42
- G: 0.61
- 3/4: 0.71
- W: 0.92
- Select the Green Channel
- Apply these values:
- B: 0.00
- 1/4: 0.25
- G: 0.42
- 3/4: 0.63
- W: 1.00
- Select the Blue Channel
- Apply these values:
- B: 0.00
- 1/4: 0.15
- G: 0.33
- 3/4: 0.77
- W: 0.94
Thursday, September 17, 2009
Aperture Cheat Sheet

I don't know what's worse: the fact that I actually know the majority of keyboard shortcuts in Aperture or the fact that I'm excited that somebody actually made a keyboard shortcut cheat sheet. The post is almost 2 years old -- that's how long it's been since Aperture 2's had a major update, I guess. But the content is still all correct from my cursory glance at the two sheets. Included in the ZIP is a printable version and a pretty version.
Wednesday, August 5, 2009
Localizing Color
- Dodge (Lighten)
- Burn (Darken)
- Saturate
- Desaturate
- Sharpen
- Blur
- Contrast
- Fade
- Size is the size of the brush. You can also change the size by using the scroll wheel or dragging two fingers on the track pad.
- Softness refers to the edge of the brush. The lower the number the harder the edge. I generally go for something pretty close to 1.00. If I want a harder edge, I just go back through the area with a smaller brush.
- Strength is how much of the effect you want. For my picture I knew I wanted a completely desaturated look, so I pushed strength all the way up.
Tuesday, July 21, 2009
Tethering
Monday, June 22, 2009
Saving Adjustments
Ok, I don't like to give recipes for photo editing, but there is one thing that I apply to most of my pictures. I like my photos with a little extra contrast, saturation, and vibrance. While I could use the Lift and Stamp tools to copy adjustments from one picture to another, I can save my adjustments as a preset.Wednesday, June 17, 2009
Stacks
Stacks is an important tool in organizing your files in Aperture. It allows you to group your photos together. When you burst a series of shots or bracket a series of shots, you may not want to see each individual image. To clean up the browser, select all the images and ⌘K. This puts the selected images into a single stack of photos. Initially it doesn't appear any different except now there's a border around all those images. ⇧K will open/close the stack. Stacks eliminates the clutter in the browser.Sunday, June 7, 2009
That's My Email!
Wednesday, June 3, 2009
Synchronize Your Watches
If you are traveling and change the time zone to the local time zone, make sure to use Metadata > Batch Change to set your photos to your home time zone. Aperture's not that good about handling time zones. Even if you tell Aperture what time zone your photos are, it doesn't really retain it. When you use any plug-ins, Aperture forgets what time zone the original photo came from and then time stamps the new version with the original time but current time zone of the Mac. For example, if the picture was tagged at 5:55PM GMT -5 and the Mac is currently GMT -8, after the picture has been run through a plug-in, the new time stamp on the edited photo will be 5:55PM GMT -8. This is why it's important to make the Batch Change to set photos to the home time zone. Hopefully this will get fixed in some future version of Aperture. I can see how this would be an issue for those photographers on the move.
Since I'm talking about time and complaining about bugs, here's a related problem. When exporting photos with the subfolder set to "Current Date," sometimes Aperture forgets what the current day is. Sometimes it thinks that yesterday is today. Just a minor issue, but one to look out for.
Saturday, May 30, 2009
Watermarks
Watermarks in Aperture can be boiled down to the following steps:- Go to Aperture > Presets > Image Export...
- In the Presets window, click "Show Watermark."
- Select an image to use
- Adjust position/opacity
- Select to scale watermark or not
- Repeat steps for each export type you want a watermark
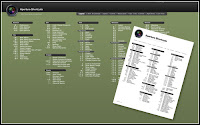
- Text based watermarks from EXIF - Sometimes all I want is a simple watermark with my name or some other EXIF data. There's no way to do this without using an export plugin.
- Scale watermarks relative to image - Instead of making me hack my image, I want to have a simple stamp and have that be consistently sized relative to the photo.
- Borders - Not quite watermarks, but I would like to have some rudimentary borders support for Aperture. Just some desaturation or blurring would be nice.
Tuesday, May 26, 2009
Lift & Stamp

I Love Vignettes

- Vignettes that lighten instead of darken
- Square instead of round (or any permutations in between)
- Redefine center of vignette
Sunday, May 24, 2009
Monochrome is boring
Simply taking a picture and making it monochrome (⌘+M) is really boring (see the middle picture). Seriously. There's a lot you can still do to a picture once you've desaturated it. First thing I do is I start going through all the color filters in the Monochrome Mixer. If I'm trying to highlight people, I prefer one of the warmer filters. Landscape for the cooler stuff. Once I've picked one that I like, then I start bumping up the contrast in the Enhance palette. For the picture on the right, I've got it set to a blue filter and the contrast at 0.25. Then to give my "black & whites" some variety, I'll sometimes then throw on some Color Monochrome action on top. For this picture, I just used the default color and lowered the Intensity to 0.4. I also added a Vignette, but I applied that to all three samples so that doesn't really count. Wednesday, May 20, 2009
Organizing My Photos (Part III)
I'm a MacBook Pro kind of guy. That means I have limited hard drive space and I take my Aperture library with me wherever I go. The trick is, I don't take it all with me when I go. That's where Relocate Masters and Consolidate Masters come in. Whenever I'm done working on a project, I relocate my masters to an external drive. It moves my masters out of my library but leaves the previews and metadata on my MacBook Pro's hard disk drive. Now the downside of relocating is that whenever I want to go back and edit that project, I need to be connected to the external drive. That's where Consolidate Masters comes in. With that external drive connected, I can bring those masters back into my library and weigh down the HDD. Another problem with relocating is that since the masters are no longer in the library, they don't get backed up into the Vault. So I make it a point of regularly backing up that external masters drive. Besides backing it up to two separated RAID drives in two separate locations (I'm OCD. I know.) I also burn every image to an optical backup. When I relocated my masters, under Subfolder Format I choose: Image Year/Month/Day. Then when I back up, I just select as many months as can fit on a disc. This keeps my optical discs in relatively tidy order. Since I named all my files, then it's also easy to find for what I'm looking.
Organizing My Photos (Part II)
When I import my files (or at least soon after using Batch Change), I rename my files so that I can find my files when I'm not using Aperture. It also makes the files a lot more meaningful than IMG_3728. Here's the format that I use: YYYYT_NAME_X. - YYYY = Year
- T = Type of shoot (more on that below)
- NAME = Something meaningful to me. If I shoot a wedding, it's usually the name of bride
- X = Index #. It starts at one.
- P = Portrait
- W = Wedding
- C = Commercial Job. Usually for stock photos or some other request that doesn't involve people.
- D = Photowalk Days
- E = Event. At parties or whenever I'm just out and about, it's usually an event of some sort.
- Y = Yelp Event (yes, I shoot enough of these for it to warrant its own code)
- V = Vacation photos. Look. Everybody has them. Might as well call them out.
- S = Snapshots. Usually stuff on my P&S. Just random stuff. Generally stuff that's not particularly important to me.
- T = Experimental/Test. Whenever I'm trying out some new technique or toy, I tag these photos with T. They're usually of pretty low value but entertaining nonetheless.
Monday, May 18, 2009
Organizing My Photos (Part I)
Sunday, May 17, 2009
Activity Window

Aperture does a lot of stuff in the background: export, generate thumbnails, generate preview, import, etc. When I find that Aperture is sluggish or when I want to just see how my progress is coming along, I bring up the Activity Window. It's located conveniently under the Window menu. But for some reason it's not mapped to a keyboard shortcut by default. Fortunately every single menu item can be mapped to a keyboard short.
So in the Commands menu (Aperture > Commands), you can customize all shortcuts. But you can't edit the default set so the first thing you have to do is duplicate the defaults to your own set. I cleverly named mine "MyDefault." The command is listed under "Show / Hide Activity." I mapped it to ⌘+0. That's the same as the Activity Window in Mail.
Tags vs. Keywords
Basically keywords will get exported out and tags don't. Tags can be used for search in the same way that keywords do... except that Apple doesn't give tags functionality nearly as much love as the keyword functionality. I find that I use tags more often than keywords as a supplement to my cataloging since I often don't want those values to get exported out. I'll throw stuff like event name or if I'm shooting people I'll put tags with their names in it. It's not a big deal to some to export out the names with their files; I like to maintain a little privacy.
To create tags:
- bring up the Metadata inspector (^D).
- Edit the view (^I).
- Click on the Other tab at the bottom.
- Then enter your new Custom Metadata
- Click on the checkbox next to your new field to add it to the view.
Now you should be able to add custom tags to your heart's content.
Hold down ⌘ when cropping
When cropping photos in Aperture 2, holding down the ⌘ (Command) key brings up these crop grid lines for aligning to the rule of thirds. It makes for some easy cropping, but I would like more. I'd like to have some options for what kind of lines do display: golden rule, nautilus shell (golden curve), diagonal lines, etc. Also there should be a preference to always display the lines. Then holding down the command key either hides or displays the grid lines depending on your preference.


