 One of the most exciting features in Aperture 3 is the ability to apply a mask on any of your adjustments by "brushing" them in/out. Having multiple adjustments and brushes feels very similar to layers with masking. In any adjustment panel, click on the gear and select "brush adjustment in/out." In the picture to the left, I made an enhancement adjustment, dropped the saturation and ran the contrast up. Then I used the brushed the adjustment off of the hydrant. The process was further expedited through the use of the "detect edges" feature. This first came out in Aperture 2's repair tool. I'm glad that this technology made it over to the brushes because on something like this photo with all hard edges I was able to do this in about 2 minutes.
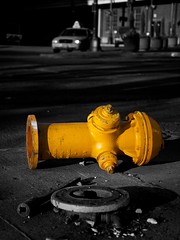
 Not quite content with the color, I then added another Enhancement adjustment panel by clicking on the gear and selecting "Add New Enhancement adjustment." On that adjustment, I bumped up my saturation and vibrance. This made the hydrant pop even further. Neat. So remember that localize color post I had a while back? Yeah, this makes it way easier and all native and non-destructive.
One of the side effects of having multiple adjustment panels is that you no longer have any limits to the max value of an adjustment. For example, the max value for saturation is 4.0. Well, if you want to go beyond that, then add another Enhancement adjustment. Now run that saturation up to 4.0. Wash. Rinse. Repeat.
There's some really exciting effects you can create natively within Aperture now. For example, you can touch up the sky without affecting the rest of the image. I'm pretty excited about this and hopefully I'll do something cool enough to share on here.
On a completely unrelated note, explored some interesting spots to shoot in Seattle. Only problem is that they are best with morning light. Any volunteers feel like being my model at the crack of dawn?
No comments:
Post a Comment